RAKSUL TechBlog

ラクスルグループのエンジニアが技術トピックを発信するブログです

ハコベルはなぜFlutterでアプリ開発を行うのか

この記事は RAKSUL advent calendar 19日目の記事です。

はじめに

2021年9月にラクスル株式会社 ハコベル事業部に入社しFlutterでモバイルアプリ開発やっています。

今まではAndroidをメインで開発しており、Flutterを触るのは入社してからになります。宣言的UIで画面を作成するので少し慣れない部分もありつつ楽しく開発してます。

課題

現在、ハコベルでは3つのアプリをリリースしてます。

  • ハコベルカーゴ(軽貨物ドライバー向け)
  • ハコベルコネクト(一般貨物ドライバー向け)
  • ハコベルコネクト(配車担当向け)

ですが、それぞれReactNativeやJava, Swiftのネイティブで書かれていたり、WebViewメインの側ネイティブなど様々な言語、SDKで作成されています。

また、ドメインや技術スタックが異なるため開発、メンテナンスするメンバーが分かれていました。

それにより、以下のような課題が発生しておりました。(主に属人化ですね)

  • 必要な知識のインプットの学習コストが高い
  • それぞれのアプリの知見が活かされづらい
  • メンテナンスできる人が各アプリ1人のためメンテナンスされず放置されていた
    • 属人化している
    • 継続的なSDK/ライブラリのバージョンアップができない
    • 追加機能を実装できない
  • CI/CDにおけるワークフローの自動化がされていないため、ビルドやアプリ配布にコストがかかる
  • 継続的にメンテナンスするエンジニア確保も難しい

これらの問題に対して我々はFlutterを選択しました

なぜFlutterか?

Flutterは既に多くの実績があり、日本でも既に多くの開発実績があります。

弊社においても上記課題に対しての解決になると思い検討を進め、Flutter導入の意思決定をしました。

主な理由は下記になります。(主にReactNativeとの比較になります)

  • iOS, Android 両OS対応
    • メンテコストが低い
    • それぞれのOSにあった表示をサポートしてくれる
  • 学習コスト低い
  • SDKをアップデートが容易
    • 依存関係が少ない
  • パフォーマンスがReact Nativeに比べ良い

私も未経験から開発しましたし、Flutter経験1週間のエンジニアが他チームからジョインしてくれ直ぐに戦力となってもらえ、実際に学習コストの低さを実感しました。

また、今までの課題を解決すべく仕様や開発におけるドキュメントを積極的に属人化を防ぐために他のチームに向けて社内のMeetupで技術紹介をするようにチームで動いてます。

どんな実装してるの?💡

現在1つ目のアプリとして最も複雑なアプリである「ハコベルコネクト(一般貨物ドライバー向け)」を来月1月リリースに向けて絶賛Flutterリプレイス中です🚀

現在開発している環境やライブラリを簡単に紹介します。

Flutter

  • Flutter: 2.5.2
  • Dart: 2.14.3

ライブラリ

  • Riverpod
    • DI + StateManagement
    • hooksは使ってないです
  • freezed
    • immutable
  • auto_route
    • Router
  • Dio
    • HTTP client

CI/CD

  • CircleCI

アーキテクチャ

MVVMをベースにRiverpodと合うようにチームで話し合いながら模索中です。

現在の実装はクリーンアーキテクチャを意識した設計にしており、各層のアクセス順は次のようになります。

それぞれの依存関係解決にはRiverpodのProviderを用いております。

UI
↓
ViewModel // ビジネスロジック & 表示用データ保持
↓
Repository // データアクセス隠蔽
↓
Data Source // Firebase DBやAPIアクセス

データを取得し画面を表示する場合は、Riverpodが提供している FutureProviderStreamProviderを用いViewModelを作成しないケースもあります。この場合は、ProviderがRepositoryを参照しデータ取得を行っています。

DatabaseはバックエンドにFirebase Realtime Databaseを使ってることもありアプリ内にデータの保存はしていないので、利用してません。

今後の展望

まずはファーストリリース向け開発を終わらせることが目標ですが、サービスはリリースがゴールではなく、継続的にユーザーに価値をデリバリーできるようにしていきたいと思っています。

そのためにはリプレイス前に出た課題を再発させないためDX(Developer eXperience)改善を合わせて行っていきたいと思っています。

  • 属人化しないように、CI/CDの立て付け
    • アプリ配布以外のリリースまで自動化
  • アーキテクチャの共有, 明文化
  • 仕様の明文化 & マネジメント
  • 継続的なSDKアップデート仕組みづくり

また、残りの2アプリについてもFlutterでリプレイスを行う予定です💪

最後に

ハコベルチームでは一緒に働くメンバーを募集しています!

興味ある方はぜひこちらからご応募ください!

https://hrmos.co/pages/raksul/jobs/HIU-TECH9

ラクスルのアドベントカレンダー全編はこちらから

https://qiita.com/advent-calendar/2021/raksul

Composition APIのsetup関数をいい感じに分割したい

こんにちは、ハコベル事業本部ソリューションスクラムチームの大川です。 この記事はRaksul Advent Calendar 2021 18日目の記事です。

ソリューションスクラムチームではハコベルコネクト を開発・運用しています。 ハコベルコネクトは物流における配送依頼や配車業務などをWeb上で管理することで 情報共有の効率化や一部作業の自動化により配車工数削減を実現するためのサービスです。 自分はチームの中でフロントエンドエンジニアとしてUIの開発をしています。

先月入社したばかり&これまで主にReactを使ってきて仕事でVueを使うのは初めてですが、 Composition APIのsetup関数をいい感じに分割するアイデアを考えてみました。 アイデア自体はちょっとしたことですが、同じ課題感を持つ方の参考になれば幸いです。

背景

ハコベルコネクトのUIはVue (v2) で実装されており、 新規作成するコンポーネントやページはComposition APIを利用する方針です。 (v2向けのプラグインを利用しています)

Composition APIは従来のOption APIと比較して、関心事に沿ってロジックを分離・集約できて可読性が向上し、 再利用可能な関数を切り出すことができて便利だと感じています。 一方で、setup関数に全ロジックを集約すると関数全体が冗長になり、 別のcomposition関数に切り出そうとしても再利用性を意識できていないことがありました。

例えば、あるフォームの実装ではページのライフサイクルフックを設定する関数と フォームのイベントハンドリングを設定する関数で分けましたが、 それぞれの分割したcomposition関数がVuexやローカルのステート・Vueのライフサイクルに依存しておりページ固有のものとなっていました。 また、setup関数の実装方針が明確になかったので、ロジックの組み方や分割方法が開発者によってバラバラになりがちでチームでの共通認識を作りにくいのも気になっていました。

考えた方針

  • composition関数の分割時に再利用性を意識できていなかった
  • setup関数の実装方針に対して共通認識を作りにくい

という課題に対して「setup関数をusecaseとserviceに分ける」方針を考えました。 setupをserviceとusecaseに分けた概要図 それぞれの役割は以下のとおりです。

  • setup関数: serviceとusecaseを呼び出し、プロパティとライフサイクルフックを設定する
  • usecase: serviceを引数で受けて、そのコンポーネント(ページ)のロジックを実装する
  • service: usecaseが必要とするVuexやローカルのステートとアクションを用意する
    • Vuexと連携するservicesと、ページのローカルステート管理用のserviceの2つに分かれる

サンプルコードを書いてみる

ユーザーが登録した住所の一覧を表示するページを例に、 上の方針でページ遷移時の以下2つのロジックを実装してみます。

  • 住所の一覧を取得するイベントハンドラー
    • 住所の一覧を取得するAPIをリクエスト
      • APIがエラーを返したらエラーメッセージを表示
  • 初期化処理ができているかのフラグ
    • コンポーネントの表示切り替えに利用する

特に分割せずにsetup関数で実装すると以下のようになります。

import { defineComponent, computed, ref } from '@vue/composition-api'

export default defineComponent({
  setup (_, ctx) {
    // ページに必要なデータをロードできてから描画するためのフラグを管理する
    const isInitialized = ref(false)

    // Vuexのストアを取得
    // NOTE: コンテキストのrootオブジェクトはComposition APIのプラグインでのみ利用可能です
    const store = ctx.root.$store
    // アプリ全体でローディング表示を管理しているプラグイン
    const loading = ctx.root.$loading

    // 住所の一覧をVuexのステートから取得
    const locations = computed<LocationState["locations"]>(
      () => store.getters["locations/locations"]
    )

    // 初期化処理
    const onCreated = async () => {
      const { error } = await loading(
        store.dispatch("locations/fetchLocations", 1)
      )
      if (error) {
       store.dispatch('app/addError', { message: '場所情報の取得に失敗しました' })
      }
      isInitialized.value = true
    }

    // DOM操作がないのでonMountedを使わず初期化処理を実行
    onCreated()

    return {
      isInitialized,
      locations,
    }
  },
})

これだけだと問題があまりなさそうですが、 たとえばページに他の機能(検索や住所情報の削除)があった場合はさらにsetup関数が長くなりそうです。 また、onCreated関数の中でVuexアクションのディスパッチとローカルステートを更新しており、 この関数を別ファイルで実装するだけでは他のページやコンポーネントでの再利用性はなさそうです。

それでは、このコードをusecaseとserviceに分ける方針で分割してみます。 まずは、serviceを用意します。 appService.ts: エラーメッセージ表示用のVuexのステートと連携する

// appService.ts
import type { SetupContext } from '@vue/composition-api'

export const useAppService = (ctx: SetupContext) => {
  const store = ctx.root.$store
  
  return {
    addError: (message: string) => store.dispatch('app/addError', { message }),
  }
}

locationService.ts: 場所の一覧を取得するVuexのステート・アクションと連携する

// locationService.ts
import { SetupContext, computed } from '@vue/composition-api'
import type { LocationState } from '@/models/location'

export const useLocationService = (ctx: SetupContext) => {
  const store = ctx.root.$store
  const loading = ctx.root.$loading

  const locations = computed<LocationState["locations"]>(
    () => store.getters["locations/locations"]
  )

  const fetchLocations = (page: number) => {
    return loading(
      store.dispatch("locations/fetchLocations", page)
    )
  }

  return {
    locations,
    fetchLocations,
  }
}

pageStateService.ts: ページ(コンポーネント)用のステートを用意する

// pageStateService.ts
// コンポーネントと同じディレクトリで実装する
import { ref } from '@vue/composition-api'

export const usePageStateService = () => {
  const isInitialized = ref(false)
  const setIsInitialized = (newStatus: boolean) => {
    isInitialized.value = newStatus
  }

  return {
    isInitialized,
    setIsInitialized,
  }
}

続けて、usecaseを用意します。

// locationUsecase.ts
// コンポーネントと同じディレクトリで実装する

type UseInitializerParams = {
  fetchLocations: (page: number) => Promise<{ error?: Error }>
  addError: (message: string) => void
  setIsInitialized: (status: boolean) => void
}

export const useInitializer = (params: UseInitializerParams) => {
  const {
    fetchLocations,
    addError,
    setIsInitialized,
  } = params

  const onCreated = async () => {
    const { error } = await fetchLocations(1)
    if (error) addError('場所情報の取得に失敗しました')
    setIsInitialized(true)
  }

  return {
    onCreated,
  }
}

最後にsetup関数でserviceとusecaseを呼び出し、プロパティとライフサイクルフックを設定します。

import { defineComponent } from '@vue/composition-api'
import { useAppService } from '@/services/appService'
import { useLocationService } from '@/services/locationService'
import { usePageStateService } from './pageStateService'
import { useInitializer } from './locationUsecase'

export default defineComponent({
  setup (_, ctx) {
    // service呼び出し
    const {
      isInitialized,
      setIsInitialized,
    } = usePageStateService()
    const {
      addError,
    } = useAppService(ctx)
    const {
      locations,
      fetchLocations,
    } = useLocationService(ctx)

    // usecase呼び出し
    const {
      onCreated,
    } = useInitializer({
      fetchLocations,
      addError,
      setIsInitialized,
    })

    // 初期化処理を実行
    onCreated()

    return {
      isInitialized,
      locations,
    }
  },
})

上記の例以外にもいくつかサンプルコードを書いてみて、以下のような気付きがありました。

(よかった点)

  • setup関数でロジックを直接実装していないので可読性が上がった
  • usecaseがVue / Vuexに依存しないので、テストしやすくなりライブラリなどの変更に強くなった
  • API呼び出しのserviceはページのロジックとは分離できたので、再利用性が上がった
  • usecase / serviceという分け方を明文化できたので、チームで認識あわせやすくなった

(改善点)

  • serviceの実装方針が決まっていない
    • Vuexのserviceとローカルステートのserviceが別のディレクトリで定義されている
    • ローカルステートは直接setup関数で、Vuexのserviceはドメインモデルごとに定義したほうがよさそう
  • usecaseのロジックが複雑にならないときは、分割して定義するメリットが大きくない
    • setup関数でserviceを利用するだけでもよさそう
  • usecaseがリアクティブな変数を参照していないので、setup関数での結合が必要になる
    • refの値をusecaseの引数にしてイベントハンドラーを定義すると、refの初期値でハンドリングされてしまう

最初に感じていた課題に対しては一定の効果がありそうですが、 serviceの実装方法などは引き続き改善していく必要がありそうでした。

さいごに

今回は可読性や再利用性の向上とチームでの共通認識をあわせてみるためのアイデアとして、 Composition APIのsetup関数をusecaseとserviceで分ける方法を紹介しました。 まだアイデア段階なので、今後もComposition APIのメリットを意識して改善し続けていこうと思います。 他にもいい方針があればぜひ教えて下さい!

ハコベルではエンジニアを絶賛募集中です! 物流業界のDXを加速させる!ハコベル事業を牽引するテックリード候補を募集! | ラクスル株式会社

Docker + Fastify + webpack-dev-server によるフロントエンド開発環境

こんにちは。ハコベル事業本部 ソリューションチームの丸山です。RAKSUL Advent Calendar 2021 17日目の記事になります。 現在はハコベルコネクトという物流における配車業務のデジタル化により、業務自動化・情報一元化を行い、顧客の業務コスト削減を図るサービスの開発をしています。

ハコベルコネクトでは11月にDocker + Fastify + webpack-dev-server(Vue CLI)という構成でフロントエンドの開発環境とシステム構成の刷新を行いました。 Nuxt.jsやNext.jsといったフレームワークを使用することも検討しましたが、永く運用してきたプロダクトなためいきなり乗り換えることは難しく、悩んだ結果上記のような構成にしています。 同じような悩みを持った方に少しでも参考になればと思い、どのような構成・実装を行なっているのか紹介します。

背景

まず初めにフロントエンド環境を刷新するに至った経緯についてですが、ハコベルコネクトはプロダクト立ち上げ時にはRuby on Railsによってフロントエンドからバックエンドまでを実装したモノリシックな構成となっていました。 その後、開発を続けるうちにコードベースも大きくなり、Railsのviewだけではフロントエンドの開発を継続するのが難しくなってきたためVue.jsを使用しRailsからは切り離した構成へと変更しました。 しかし、完全なSPA化などには至っておらず、またページアクセスの際のルーティングやアセットの配信などは引き続きRailsを使用しており、Gitリポジトリとしても1つのリポジトリに全てが入った状態となっていました。

永らくその状態で運用されていたのですが、フロントエンドとバックエンドが同じリポジトリにあることで、どちらかの変更しかしていなくてもデプロイ時に全体のビルドが行われてしまい時間がかかっていたことや、開発環境やライブラリの変更を行う際に必要以上に影響範囲を気にしなくてはならないなどの問題が発生していました。

そこで、リポジトリをフロントエンド用とバックエンド用に分け、ページのルーティングやアセットの配信もフロントエンド側で行うようにすることで、RailsはAPIサーバとしての責務に集中しお互いを疎結合にすることを目的としてフロントエンド開発環境の刷新を行いました。

構成

まず初めに考えたのはフロントエンド環境を完全にSPA化し、Nuxt.jsなどを使用してフロントエンドサーバを構築することでした。しかし、ページごとにエントリポイントがあり、それぞれを別ファイルとしてビルドしている現状から、限られた時間やリソースの中でその状態まで一気に対応することは難しいという結論に至りました。 そこで、まずはリポジトリを分割することとルーティングなどのフロントエンドの責務をバックエンドから引き剥がすことを第一として既存のVueのコードベースやビルドフローにはできる限り変更を加えない方法をとることにしました。

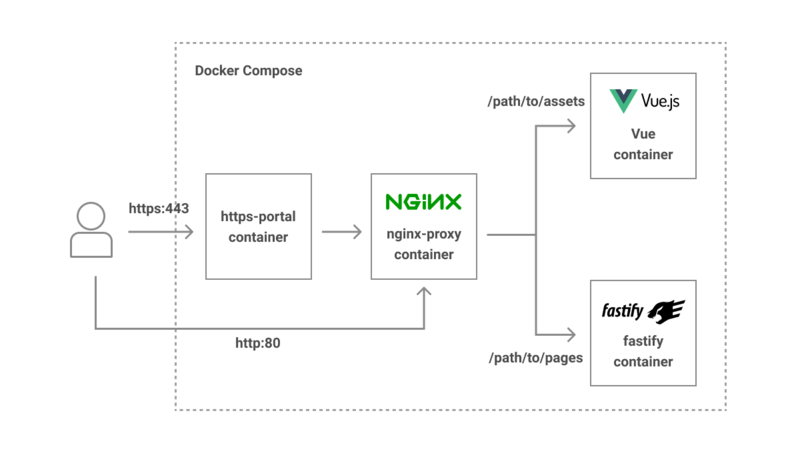
最終的な開発環境の構成は以下

  • Vue部分はこれまで通りページごとのエントリポイントを持ち、開発中はwebpack-dev-server(Vue CLI)を使用する
  • ページのルーティングにはFastifyを使用。本番環境ではアセットの配信も行うが開発中はwebpack-dev-serverが行う
  • ローカルでの開発環境はdocker-composeを用い、webpack-dev-server とFastifyへの振り分けにはnginx-proxyイメージを使用する
  • ローカルでhttpsでのアクセスが必要な場合には https-portalイメージを使用

docker-compose.ymlのサンプルは以下のようになります。(説明用のためいくつかの設定は省略しています)

version: '3'

services:
  https-portal:
    profiles:
      - https
    image: steveltn/https-portal:latest
    ports:
      - 8443:443
    environment:
      STAGE: local
      DOMAINS: 'localhost -> http://nginx-proxy:80'
  nginx-proxy:
    image: jwilder/nginx-proxy:0.9.0
    ports:
      - 8080:80
    volumes:
      - /var/run/docker.sock:/tmp/docker.sock:ro
      - ./dev-proxy:/etc/nginx/vhost.d
    depends_on:
      - vue
      - fastify
  vue:
    build: ./vue
    hostname: vue
    environment:
      VIRTUAL_HOST: vue.local
      VIRTUAL_PORT: 8080
    volumes:
      - ./vue:/app:delegated
      -/app/node_modules
    command: "yarn dev"
  fastify:
    build: ./fastify
    environment:
      VIRTUAL_HOST: localhost
      VIRTUAL_PORT: 80
    volumes:
      - ./fastify:/app:delegated
      -/app/node_modules
    command: "dockerize -wait http://vue:8080/webpack-dev-server -timeout 10m -wait-retry-interval 5s yarn serve"

ポイント

上記構成のポイントをいくつかご紹介します。

nginx-proxy

Docker Hub にて公開されているDocker image です。 nginxのリバースプロキシを構成し、複数コンテナ間のアクセス振り分けなどを簡単に設定することができます。 各serviceのenvironmentに VIRTUAL_HOST VIRTUAL_PORT を指定するとその VIRTUAL_HOST でnginx-proxyコンテナにアクセスがあった際に各serviceの VIRTUAL_PORT で指定したportへアクセスを振り分けてくれます。

services:
  nginx-proxy:
    ports:
      - 8080:80
  vue:
    environment:
      VIRTUAL_HOST: vue.local
      VIRTUAL_PORT: 8080
  fastify
    environment:
      VIRTUAL_HOST: localhost
      VIRTUAL_PORT: 80

これで http://localhost:8080 へアクセスすることで nginx-proxyコンテナがfastifyコンテナの80番ポートへとアクセスを振り分けてくれます。 ただしjsファイルなどのアセットはvueコンテナよりwebpack-dev-serverから配信を行うため、vueコンテナへと振り分けを行う必要があります。 そこで /dev-proxy ディレクトリ内に localhost というファイルを作り、nginxのlocation設定を記述します。

# docker-compose.yml
version: '3'

services:
  nginx-proxy:
    volumes:
      - ./dev-proxy:/etc/nginx/vhost.d # ./dev-proxy内のファイルをマウントする
# /dev-proxy/localhost

location ~ ^/(assets/.*) {
    proxy_pass http://vue.local/$1;
}

これで、 http://localhost:8080/assets 配下へのアクセスはvueコンテナへと振り分けられます。 また、以下のような記述も追加することで、 http://localhost:8080/_vue 配下へのアクセスはvueコンテナへと振り分けられるようになり、アセットファイルのパスや内容を調査したい時にデバッグがしやすくなり便利です。

# /dev-proxy/localhost

location ~ ^/_vue/(.*) {
    proxy_pass http://vue.local/$1;
}

https-portal

こちらも Docker Hub にて公開されているDocker imageです。 nginx, Let's Encrypt を使用してHTTPSサーバーを立ち上げることができます。 https環境を使用する必要がある場合のために使用しています。

# docker-compose.yml

services:
  https-portal:
    profiles:
      - https
    image: steveltn/https-portal:latest
    ports:
      - 8443:443
    environment:
      STAGE: local
      DOMAINS: 'localhost -> http://nginx-proxy:80'
  nginx-proxy:
    image: jwilder/nginx-proxy:0.9.0

このように設定することで、 https://localhost:8443 へのアクセスをnginx-proxyコンテナに振り分けることができ、自動でLet's EncryptよりSSL証明書を取得してくれます。 また、httpsでの挙動確認などが必要な場面は限られるため、常にhttps-portalコンテナを立ち上げておく必要はありません。 そのため profiles: https という値を設定しておくことで、docker-composeの立ち上げ時に --profile https というオプションを指定した時のみ起動するようにしています。

dockerize

https://github.com/jwilder/dockerize

他のコンテナの起動を待つために使用しているツールです。 vueコンテナ内ではビルド時にwebpack-manifest-plugin を使用しているため、fastifyコンテナの起動時に各ページで読み込むjsのエントリポイントを決める際にvueコンテナの manifest.json を参照する必要があります。 そのため、fastifyコンテナの起動はvueコンテナの起動を待ってから行う必要があり、それを実現するために dockerize を使用しました。

まずfastifyコンテナのDockerfile内で dockerize をインストールします。

# /fastify/Dockerfile

ENV DOCKERIZE_VERSION v0.6.1
RUN wget https://github.com/jwilder/dockerize/releases/download/$DOCKERIZE_VERSION/dockerize-linux-amd64-$DOCKERIZE_VERSION.tar.gz \
    && tar -C /usr/local/bin -xzvf dockerize-linux-amd64-$DOCKERIZE_VERSION.tar.gz \
    && rm dockerize-linux-amd64-$DOCKERIZE_VERSION.tar.gz

そしてdocker-compose.yml内のcommandでdockerizeを使用するようにします。

# docker-compose.yml

services:
  fastify:
    command: "dockerize -wait http://vue:8080/webpack-dev-server -timeout 10m -wait-retry-interval 5s yarn serve"

このように記述することでfastifyコンテナは http://vue:8080/webpack-dev-server へのアクセスを試み、成功すれば起動するようになります。 アクセスに失敗した場合には5秒おきにリトライを行い成功するまで待つことができるようになります。 実際に使用する際にはリトライ間隔はdocker-compose起動時に引数として指定できるようにしておくと良いかと思います。

最後に

このようにして、フロントエンドの開発環境を全てdocker-composeの中にまとめることでき、1つのコマンドで依存関係のダウンロードからサーバの起動までをローカル環境を汚さずに行えるようになりました。

気をつけたい点として、vueコンテナに関してはビルドのリソース消費が大きく、またコンテナにマウントするファイルの数も多くなりがちなので、マシンスペックやプロジェクトの規模によってはビルドに非常に時間がかかるようになってしまう場合もあるでしょう。 その場合はvueコンテナはDockerコンテナでのビルドは行わずにローカルで起動させ、ローカルサーバに向けてnginx-proxyの振り分けを設定した方がいいかもしれません。 我々も最終的にはVueについてはDockerを使用せずにローカルサーバを使用することもできるように変更を加えています。

冒頭でも触れましたが、現在ではNuxt.jsやNext.jsなどWebサーバ機能を内包したメジャーなフレームワークも多く存在するためそういった手段を取った方がシンプルな構成にはなるかと思います。 しかし、実際に運用しているプロダクトでは必ずしもそういったフレームワークへの乗り換えが簡単に行えるとは限らず、悩んでいる方も多いのではないかと感じています。

この記事がそういった方に少しでも参考になれば幸いです。


ハコベルでは一緒に働くエンジニアを募集中です!

興味ある方はぜひこちらからご応募ください!

物流業界のDXを加速させる!ハコベル事業を牽引するテックリード候補を募集! | ラクスル株式会社

ラクスルのアドベントカレンダー全編はこちらから

Calendar for RAKSUL Advent Calendar 2021 | Advent Calendar 2021 - Qiita

Working in an IN-JA unit

Introduction

Today's article comes from the Josys product team. This article is about the makeup of the product team, the interworking of people from different countries, some of the challenges and how we address them to create a winning product!

About Josys

Josys is the newest addition to RAKSUL's business lines. It is an integrated IT device and SaaS management cloud platform for companies to simplify and optimise their corporate IT tasks as they pertain to their employee lifecycle management. It includes functionalities such as the selection and procurement of IT devices, the maintenance and interplay of the IT user-identify ledger, IT device ledger and software application ledger. The launch of Josys in Japan was on September 1st, 2021.

For RAKSUL, this is the first endeavour where the product development team is predominantly based outside of Japan, in the RAKSUL's India entity called RAKSUL India Private Limited (RIPL). While existing teams in Raksul Printing, Hacobell, and Novasell businesses already cooperate with engineers in Vietnam and India, Josys is the first business unit where the product development team is almost entirely international.

Josys Organization Structure

The entire Josys unit currently consists of about 25 members comprising developers (server-side, front-end and QA automation engineers), business development members, sales interns, operations personnel, product manager, bilingual coordinators and the leadership. The organisation has a flat structure and highly interconnected with no impediments for information flow and knowledge exchange.

The sales and the business development team, including product manager are located in Tokyo, Japan, and so are UX designer and a key developer. The product development team, development contractors, the Chief Architect and the Data Analyst/Scientist are located in Raksul India. The leadership team is based in both Japan and India.

Most of the day-to-day communication across the global Josys team is over Slack (mostly in English with the help of inline translation apps) and regular Agile meetings. The weekly cooperation meeting is where all the teams in the Josys unit participate, and is facilitated by a live translator to ensure everyone's common understanding and participation.

Product Development

The product development flow originates with a business development team's insights gleaned from various customer meetings and interactions in Japan. Internally, these insights will then take the form of hypotheses that require customer validation via mocks, POCs and working prototypes. The cross-functional team discussions will transform these requirements to epics and stories for the product development team to implement incrementally in short sprints (1-2 weeks long). Clarifications and refinements of requirements occur over the duration of the sprint in daily standups and other regular meetings on topics such as error handling, UI implementation, refactoring, etc. Once the feature is released at the end of the sprint, it is demo'd to the entire cross-functional team and the business development team will promote it with the customers. Questions, issues, improvements, bugs and further brush-ups are addressed by the product development team with the business development team playing the role of an effective conduit.

Constraints of a Global Team

While our unit has good cooperation between members in the Japan office and RIPL, there are some minor challenges we face. The first is the dependency resolution due to non-overlapping holidays in the two countries. Sometimes either of the teams can be on holiday while members of the other country are not. Therefore, when some task or query is dependent on a member, it might have to wait for its resolution. However every member in the team is very diligent and takes ownership in absence of any member.

The second challenge is the different time zones. Japan is 3.5 hours ahead of India, hence our "morning" standup meeting starts at 2 p.m. Japan time. We are all always considerate of others' time zone but there are times when a Raksul India member is required to start their day really early, or a Japan team member needs to respond to questions late at night.

Bridging the Language Gap

With the customer base for Josys being only in Japan today, all insights, feedback and requirements need to be gathered and translated to the common language, English, for the product development team to work on them. Customer meeting minutes, documents describing usage trends, issues encountered, insights and user experience design all need to be translated without too much lag. For this, we have bilingual coordinators who act as bridge professionals that facilitate all cross-language coordinations. They help with translation of documents, designs and also conduct real-time translations during meetings. The business background needs to be translated contextually as well as linguistically for the development team. This is where our bilingual team members, our product manager and an engineer in Japan excel and facilitate clear understanding of the business needs by the product development team. Lastly, we work very closely with our CTO in Japan who is also very fluent in english and helps us at every step.

Conclusion

Josys, Raksul's latest business unit and SaaS platform, is powered by a global team of spirited professionals across Japan and India, to bring digital transformation of corporate IT to businesses. Raksul is breaking new ground with this initiative to develop a product from across the globe to serve the Japan market, and every member of the team is displaying amazing adaptability and cooperation to handle the natural challenges of such an endeavour. The success of Josys as a product is an example of great coordination between people that transcends geographical boundaries.

Raksul is hiring in India!

https://www.linkedin.com/company/raksul-india/jobs/

See here for all Advent Calendar articles by Raksul

https://qiita.com/advent-calendar/2021/raksul

Protocol Buffersを使ってSQSのメッセージを構造化してみた

はじめに

こんにちは。RAKSUL Advent Calendar 2021 15日目を担当するハコベルの吉岡です。 本日はメッセージキューを使う際にProtocol Buffersを使って構造化されたメッセージのやりとりができないかのPoC(Proof of Concept)を紹介させていただきます。

背景

今取り組んでいるプロジェクト内でAmazon SQSを使うことになったのですが、現段階でSQSにメッセージをエンキューするのがGoのサービスで、メッセージを受け取るのがPythonのサービスということが想定されています。SQSの技術検証を進める中で「構造化されたデータをメッセージとしてやりとりできないか」とふと思い、「Protobufをうまいこと使えないか」という考えが浮かびました。 事例がないかリサーチしていると、自分がやりたいことと同じことをやっている方の記事があったのでこちらを参考に進めてみました。

今回はメッセージのプロデューサーをGo、コンシューマーをPythonで書いた場合の例を紹介したいと思います。 なお、ある程度Protocol Buffer, Message Queue, Docker, Go, Pythonの知識があることを前提に書いています。ご了承ください。

サンプルコード

いきなりですがサンプルコードはこちらです。

あくまでPoCなのでコードが少し雑なのはお許しください。こちらを見ながら読み進めていただけると理解しやすいと思います。それでは解説していきます。

.protoファイルを用意する

まずはprotoフォルダを作り、その中に.protoファイルを作成します。今回はPoC用のシンプルなメッセージを定義します。

message Message {
  string title = 1;
  repeated Sentence sentences = 2;
}

message Sentence {
  int64 id = 1;
  string text = 2;
}

https://github.com/no7wataru/proto-sqs-poc/blob/main/proto/message.proto

コードを生成する

.protoファイルが用意できたら、続いてはGoとPythonのコードを生成します。protoc実行用のDockerイメージを作り、それを使ってコードを生成してみます。Dockerfileはこんな感じ。

FROM golang:1.17-buster

ARG VERSION=3.19.1

RUN apt update -y && apt install -y curl unzip
RUN curl -LO https://github.com/protocolbuffers/protobuf/releases/download/v${VERSION}/protoc-${VERSION}-linux-x86_64.zip
RUN unzip protoc-${VERSION}-linux-x86_64.zip -d /usr/local
RUN rm protoc-${VERSION}-linux-x86_64.zip

RUN go install google.golang.org/protobuf/cmd/protoc-gen-go@latest
RUN export PATH="$PATH:$(go env GOPATH)/bin"

ENTRYPOINT ["protoc"]

https://github.com/no7wataru/proto-sqs-poc/blob/main/proto/Dockerfile

イメージをビルド。

$ docker build -f proto/Dockerfile -t protoc .

ビルドしたイメージを使って使ってコードを生成します。

$ docker run --rm -v (eval pwd)/proto:/proto protoc --proto_path=/proto --go_out=/proto --go_opt=paths=source_relative --python_out=/proto message.proto

実行するとprotoフォルダ内にmessage.pb.gomessage_pb2.pyというファイルが生成されているのが確認できます。

メッセージキューを立ち上げる

実際の環境ではAmazon SQSを使う予定ですが、今回はSQSと互換性のあるElasticMQを使ってローカルにメッセージキューのサービスを立ち上げて使っていきます。

mqというフォルダを作成してその中にelasticmq.confというファイルを作ります。こんな感じに書いておくとproto-test-mqというキューが起動時に作成されます。

queues {
    proto-test-mq {
    defaultVisibilityTimeout = 10 minutes
    delay = 0 seconds
    receiveMessageWait = 20 seconds
    fifo = false
    contentBasedDeduplication = false
  }
}

https://github.com/no7wataru/proto-sqs-poc/blob/main/mq/elasticmq.conf

あとは以下のようにdocker runを実行するとメッセージキューが立ち上がります。

$ docker run --rm -p 9324:9324 -p 9325:9325 -v (eval pwd)/mq/elasticmq.conf:/opt/elasticmq.conf softwaremill/elasticmq-native

ElasticMQは簡易的なUIも用意されるのでそちらでキューの情報を確認することもできます。9325のポートが簡易UIになります。 http://localhost:9325

プロデューサーを作成する

続いてメッセージを送信するプロデューサーをGoで書きます。出来上がったコードはこんな感じです。

package main

import (
  "encoding/base64"

  "github.com/aws/aws-sdk-go/aws"
  "github.com/aws/aws-sdk-go/aws/session"
  "github.com/aws/aws-sdk-go/service/sqs"
  pb "github.com/no7wataru/proto-sqs-poc/proto"
  "google.golang.org/protobuf/proto"
)

const (
  endpoint  = "http://localhost:9324"
  region    = "ap-northeast-1"
  queueName = "proto-test-mq"
)

func main() {
  sess, err := session.NewSession()
  if err != nil {
    panic(err)
  }

  client := sqs.New(sess, &aws.Config{
    Endpoint: aws.String(endpoint),
    Region:   aws.String(region),
  })

  output, err := client.GetQueueUrl(&sqs.GetQueueUrlInput{
    QueueName: aws.String(queueName),
  })
  if err != nil {
    panic(err)
  }
  println(*output.QueueUrl)

  m := &pb.Message{
    Title: "This is the title of the message",
    Sentences: []*pb.Sentence{
      {
        Id:   1,
        Text: "This is the first sentence.",
      },
      {
        Id:   2,
        Text: "This is the second sentence.",
      },
    },
  }
  data, _ := proto.Marshal(m)
  message := base64.StdEncoding.EncodeToString(data)

  res, err := client.SendMessage(&sqs.SendMessageInput{
    QueueUrl:    output.QueueUrl,
    MessageBody: aws.String(message),
  })
  if err != nil {
    panic(err)
  }

  println(*res.MessageId)
}

https://github.com/no7wataru/proto-sqs-poc/blob/main/producer/main.go

実際にSQSを使う場合ははじめのsessionを作る部分を少し変更する必要があるはずです。ローカルのElasticMQで試す分にはこれで十分です。

メッセージを作成したらproto.Marshal()でシリアライズ → base64で文字列に変換 → エンキュー という流れになります。実際に実行してみます。

$ go run producer/main.go

http://localhost:9324/012345678901/proto-test-mq
a765e3fd-1c39-48f5-b320-54e71a901900

ElasticMQのダッシュボードからもメッセージがうまくエンキューされているのが確認できます。

コンシューマーを作成する

続いてはメッセージを受信するコンシューマーのコードになります。こちらはPythonです。

import os
import sys
import base64
import boto3

sys.path.append(os.path.normpath(os.path.join(
    os.path.dirname(os.path.abspath(__file__)), '..')))
from proto.message_pb2 import Message


endpoint = 'http://localhost:9324'
region = 'ap-northeast-1'
queue_name = 'proto-test-mq'
access_key = 'x'
secret_key = 'x'

client = boto3.resource('sqs',
                        endpoint_url=endpoint,
                        region_name=region,
                        aws_secret_access_key=access_key,
                        aws_access_key_id=secret_key,
                        use_ssl=False)
queue = client.get_queue_by_name(QueueName=queue_name)

messages = queue.receive_messages(
    AttributeNames=[
        'All'
    ],
    MaxNumberOfMessages=1,
    MessageAttributeNames=[
        'All'
    ],
    VisibilityTimeout=0,
    WaitTimeSeconds=0
)

for message in messages:
    data = base64.b64decode(message.body)
    msg = Message()
    msg.ParseFromString(data)
    print(msg.title)
    for sentence in msg.sentences:
        print(sentence.id)
        print(sentence.text)
    message.delete()

https://github.com/no7wataru/proto-sqs-poc/blob/main/consumer/consumer.py

今度はプロデューサーで行ったのと逆の処理をし、データをパースします。

コードを実行すると無事に結果が出力されます。

$ python consumer/consumer.py

This is the title of the message
1
This is the first sentence.
2
This is the second sentence.

まとめ

いかがだったでしょうか?Protocol Buffersを使うことで構造化されたデータとしてメッセージを送受信することができました。メッセージの構造に変更があった際も.protoファイルを更新してコードを再生成するだけなので簡単ですね。 また、サンプルコード内では省略しましたが、SQSにメッセージを送信する際に一緒にメタデータを渡すことができます。.protoのバージョン等をメッセージと共に送信することでデータ構造に変更があった際も柔軟に対応できると思います。 Amazon SQSなどのメッセージキューを使う際には是非検討してみてください。

ハコベルチームでは一緒に働くメンバーを募集しています! 興味ある方はぜひこちらからご応募ください!

ラクスルのアドベントカレンダー全編はこちらから。